
This Pistachio Raspberry Lime Mousse Cake is a delicate and elegant cake perfect for Christmas or New Year’s Eve with a delightful flavor and texture. Having in mind the three Christmas colors, green, white, and red, I created this amazing dessert with this amazing flavor combination of roasted pistachios, lime, white chocolate, and fresh raspberries. This cake is very light and simply bursts with flavor in each bite. I am so delighted by the results and I am glad to be sharing this cake with you all.
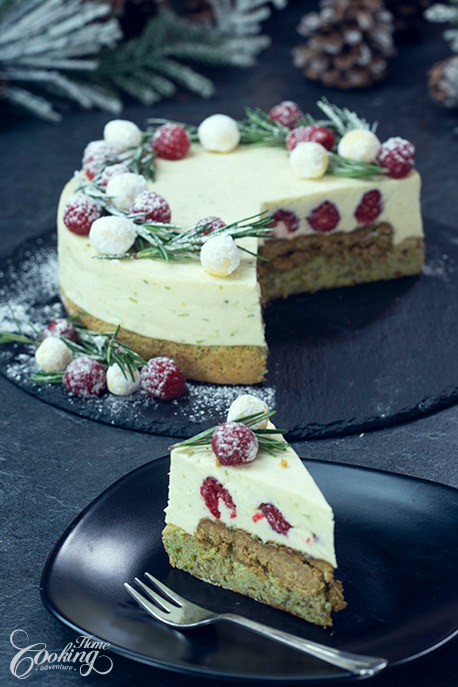
The cake consists of a delightful pistachio sponge cake at the bottom, topped with a crispy crunch made with homemade pistachio paste, white chocolate, and paillette feuilletine, followed by a smooth and silky white chocolate and lime mousse and fresh raspberries.
Beautifully decorated in white, red, and green colors, this Pistachio Raspberry Lime Mousse Cake looks really impressive and very festive. The recipe is quite easy to prepare and will surely delight your family and friends.
For other desserts in red, white, and green colors you may also like these Christmas Swirl Cookies or these Marbled Icing Sugar Cookies.
Hope you will give this mousse cake recipe a try. If you do, don’t forget to tag me on Instagram. Would love to see how it turned out for you. Enjoy!
RELATED POSTS:
Winter Cake
No-Bake Raspberry Yogurt Mousse Cake
Triple Chocolate Cranberry Mousse Cake

Pistachio Raspberry Lime Mousse Cake
Ingredients
Pistachio Sponge Cake
- 2 eggs, separated
- 1/3 cup (70g) sugar
- 1/4 tsp (1g) salt
- 2/3 cup (70g) roasted pistachios, ground
- 2 tbsp (20g) all-purpose flour
- 1 tsp (5g) pistachio extract
For Pistachio Paste
- 1 cup (100g) pistachios, toasted
- 1 tbsp (8g) powdered sugar
- 1/4 tsp (1g) salt
For the crunch
- 1 cup (80g) Paillete Feuilletine or corn flakes
- 1.5 oz (45g) white chocolate, melted
- 1/2 tsp (3g) pistachio extract
White Chocolate Lime Mousse
- 8 oz (230g) white chocolate, cut in small pieces
- 2/3 cup (160g) whipping cream
- 2 tsp (8g) gelatin powder
- 3 tbsp (45 ml) cold water
- Zest of a lime
- 1 ½ cup (360g) whipping cream (35% fat), chilled
- 4 oz (120g) fresh raspberries
For decorating
- Fresh rosemary
- fresh raspberries
- white chocolate truffles
- powdered sugar
Instructions
- Preheat the oven to 300F (150C). Toast the 1 ⅔ cups (170g) raw pistachios for 10 minutes. Divide 2/3 cup (70g) for the sponge cake and 1 cup (100g) for the pistachio paste.
Prepare the pistachio sponge cake.
- Preheat the oven to 325F (160C). Grease with butter a 8 inch (20cm) pan and line with parchment paper.
- Separate whites from yolks. Add salt over the whites and start whipping until foamy.
- Gradually add sugar and continue whipping until soft peaks form.
- Gently fold in beaten egg yolks, ground toasted pistachios and flour.
- Pour the batter into the prepared pan and bake for 17-20 minutes until a toothpick inserted into the center comes out clean. Don’t overbake.
- Cool completely.
Prepare the pistachio paste.
- Place the remaining toasted pistachios into the bowl of a food processor. Add powdered sugar and salt and process for about 5 minutes until it gets into a thick paste.
- Transfer the paste into a medium bowl. Add melted chocolate and pistachio extract and mix to combine. Add pailleté feuilletine and mix to combine.
- Spread the pistachio crunch on top of the pistachio cake leaving a ½ inch (1cm) border.
- Refrigerate until the mousse is prepared.
Prepare the white chocolate and lime mousse.
- In a heatproof bowl add the white chocolate and 2/3 cup (160g) whipping cream. Place the bowl over a saucepan with simmering water, over low heat, until all the chocolate is melted.
- Meanwhile dissolve gelatin in cold water and let it swell for about 5 to 10 minutes. Place the gelatin over low heat just until the gelatin dissolves and pour it over the melted chocolate mixture. Add lime zest, mix to combine and let the chocolate mixture cool completely at room temperature.
- Whip the remaining 1 1/2 cup (360g) chilled whipping cream until soft peaks form. Add melted white chocolate mixture and mix until well combined.
- Transfer the mousse into a piping bag fitted with ½ inch (1cm) plain tip.
- Add a ring around the cake and line with an acetate sheet. Pipe a bit of mousse on the edges and on top of the crunch.
- Arrange the fresh raspberries and cover with remaining mousse.
- Refrigerate the cake for 4-6 hours or better overnight.
- Decorate the cake with fresh rosemary, fresh raspberries, white chocolate truffles and dust with powdered sugar. Enjoy!
Video
Nutrition
Did you make this recipe?
Please let me know how it turned out for you! Leave a comment below and tag @homecookingadventure on Instagram and hashtag it #homecookingadventure.
I can’t find pistachios extract!
Will the cake be bland with almost no taste?
Can I replace it by something else?
Thank you 😊
You can use almond extract instead, or simply vanilla.
How long is the cake good for after its all put together and decorated? (if sat over night before being decorated)
Could it be made 2 days in advance? Thank you!!
Yes.. it can be made with 2 days in advance. Should be just fine up to a week. Always refrigerate the leftovers.
Hi Ella,
Happy Holidays. I have two questions on the recipe.
1. When making the pistachio paste, I don’t get a wet paste like you show in the video. Mine is much dryer. I added a couple of splashes of water, but it was still dry compared to yours. With only 3 ingredients, I’m not sure what I might be doing wrong.
2. Your printed recipe calls for one cup of Paillete Feuilletine, but in your video it looks like you are using at least 3, if not 4, cups. I used one cup (which is good because my pistachio paste was so dry); is there a mismatch between the recipe and the video?
Thanks!
Steve
Hi Steve😊, sorry for the late answer. For the Pistachio paste you just have to keep mixing until it gets similar to mine. Depending on the processor used, this may take 5 minutes or more. Yes, it is dry in the beginning, but if you keep processing the mixture, the oils release and create this beautiful pistachio paste. As for the Paillete Feuilletine I have used no more than 1 cup (80g of crumbs). I have bought the crispy French crepes and crumbled myself. The bowls used there are small to medium, but that might not be very clear in the video as it was a pretty close-up scene. I definitely never use 3 to 4 cups 🙂 for an 8 inch (20cm) cake. Sorry this cake made you some problems, but hope you could enjoy the cake in the end:) Wish you a Happy New Year to you and your family. 😊
Are the pistachios salted or unsalted?
I use unsalted pistachios.
Hi , Can the mousse be made without the gelatin ?
For the best results, I suggest using gelatin. You can try making it without, since it will set slightly thanks to the white chocolate, but for sure it will not hold as well as the one I made.