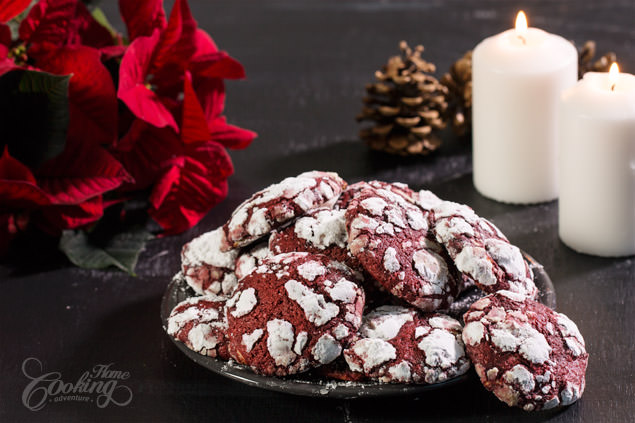
If you don’t have time to make Red Velvet Cake for the holidays try Red Velvet Crinkle Cookies instead, they are so easy to prepare and you can enjoy red velvet cake flavor in no time.
These cookies are soft and chewy and look so pretty and festive in these red and white colors. You can leave out white chocolate, though the chocolate brings an amazing texture and flavor.
These cookies can be made in advance as you can make with other cookies, and you can freeze them until ready to serve.
If you are in search of holiday cookies you may also like these Coconut Crinkle Cookies. With a soft, chewy interior, melted white chocolate, and snowy look, they are one of the best cookies to prepare for the winter holidays. If you love chocolate, these Easy Chocolate Crinkle Cookies are the right treat for you, not only during the holiday season but all year round. Also, these Candy Cane Double Chocolate Cookies look very festive and have an amazing flavor.
Hope you will give these Red Velvet Crinkle Cookies a try, tag me on Instagram if you do, and enjoy!

Related Posts:
Chocolate Crinkle Cookies
Red Velvet Cake
Butter Cookies (Pastisetas)

Red Velvet Crinkle Cookies
Ingredients
- 1 ⅔ cups (210g) all-purpose flour
- 3 tbsp (24g) unsweetened cocoa powder
- 1 ½ tsp (6g) baking powder
- 1/2 tsp (3g) salt
- 1/2 cup (113g) butter , softened
- 1 cup (200g) sugar
- 2 eggs
- 1 tsp (5ml) vanilla extract
- 1 tsp (5ml) lemon juice
- Red food coloring gel
- 3.5 oz (100g) white chocolate , chips/chunks
- 1/2 cup (60g) powdered sugar
Instructions
- In a medium-sized bowl, whisk together the flour, cocoa powder, baking powder and salt. Set aside.
- In a large bowl mix butter with sugar until light, creamy and fluffy. Add eggs one at a time. Add vanilla extract and lemon juice and mix to combine. Incorporate red food coloring.
- Gradually incorporate flour mixture. Fold in white chocolate chips/chunks. Cover the bowl with plastic wrap and refrigerate for at least 2 hours.
- Preheat oven to 350F (180C). Line baking sheets with parchment paper. Place powdered sugar into a bowl.
- Using your ice cream scoop take equal portions of dough, about 1 inch (2.5 cm) balls,and roll into the powdered sugar, coating thickly. Place on the prepared baking sheet. Repeat with remaining dough, keeping 2 inches (5cm) space between cookies.
- Bake 10-12 minutes or until cookies are cracked. Cool on baking sheets for 5-10 minutes. Remove to cooling rack to cool completely.
Video
Nutrition
Did you make this recipe?
Please let me know how it turned out for you! Leave a comment below and tag @homecookingadventure on Instagram and hashtag it #homecookingadventure.
Hi, first congratulations on your work. Then, I have a question, is the 2 hour refrigeration strictly necessary? I do not know if I have that much time. I am making these with our kids and they do not know how to wait that long for cookies particularly when they involve chocolate.
Ive done this recipe every Christmas for almost 5 years. The fridge time makes it a-lot less messy to roll them in the powdered sugar, when the dough is chilly and doesn’t stick to your hands. Also- For some reason if you use the freezer and then put them in the oven they don’t rise.
Hello, I made this for Christmas and gifted it to my friends and relatives. This is so easy recipe. Thanks for sharing with us.
These are beautiful and look so delicious! I love how simple they are to make!
Somehow after I added the dry ingredients (cocoa powder, flour…) it made the mixture turn brown and not a nice brown shade. Hopefully they taste good
The amount of cocoa powder in the video does NOT match the recipe. In the video it is 1 2/3 Cups (210 g), In the recipe, it is 3 Tablespoons (24 g). Which is correct?
Thank you for pointing out the typo in the video. The correct amount of cocoa powder is 3 tablespoons (24 g) and the flour is 1⅔ cups (210g),as written in the recipe. I’m really sorry for the confusion and thank you for your understanding.