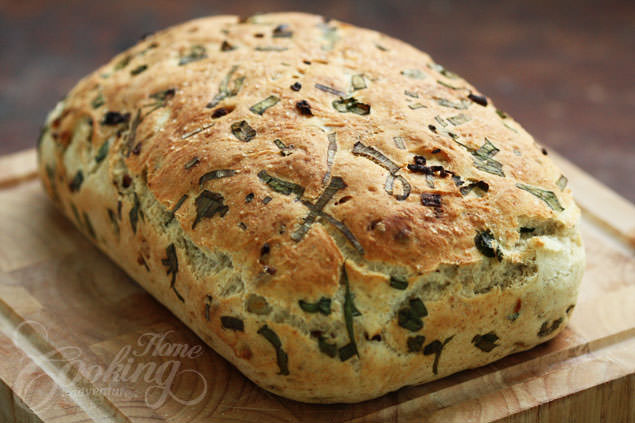
This Caramelized Onion Bread is by far one of my favorite bread recipes. It is soft and fluffy and the flavor from the onions bring makes you want more and more. It smells wonderful while baking and tastes incredibly good.
The recipe is easy and takes only a few minutes to prepare. This caramelized onion bread is going to be devoured so quickly that you might need to consider making two loaves instead of one.
How to make caramelized onion bread
To make this delicious caramelized onion bread, start by heating oil in a frying pan over medium heat. Add finely chopped onion and cook until it becomes soft and turns golden brown. Season with a pinch of salt, then set the onions aside to cool.
In a large mixing bowl, combine flour and chopped green onion leaves. In a separate small bowl, dissolve the fresh yeast with salt in 1/3 cup (80 ml) of water. Once dissolved, add the yeast mixture to the flour along with the remaining 1 cup (240 ml) of water. Mix everything together until it starts to come together, then add the cooled caramelized onions.
Knead the dough until it is smooth and pulls away from the sides of the bowl. This should take about 5-7 minutes. Cover the bowl with a clean kitchen towel and let the dough sit at room temperature for about 1 hour, or until it has doubled in size.
Once the dough has risen, transfer it to a floured surface and shape it into a loaf. Place the loaf into a greased 6×10 inch (15×25 cm) baking tray or a regular loaf pan. Let the dough rise again for about 30 minutes. If desired, sprinkle a bit of salt and some additional chopped green onion leaves on top of the loaf for added flavor and visual appeal.
Preheat your oven to 470°F (240°C). Place a small pot of water at the base of the oven to create steam, which helps achieve a nice crust on the bread. Bake the loaf for 15 minutes with the steam, then carefully remove the pot of water from the oven. Reduce the oven temperature to 450°F (230°C) and continue baking for another 10-15 minutes, or until the bread is golden brown and sounds hollow when tapped on the bottom.
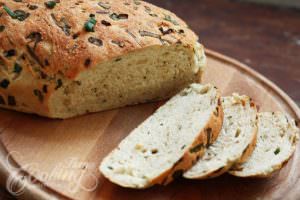
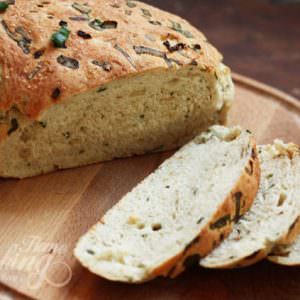
Once baked, remove the loaf from the oven and transfer it to a wire rack to cool completely before slicing. Enjoy the rich, savory flavor of the caramelized onion bread on its own or with your favorite toppings.
Hope you will try this Caramelized Onion Bread recipe and enjoy these as much as we did. If you do, make sure to share the photos with me on Instagram. Would love to see how these turn out for you.
For more bread ideas check our full collection of Bread Recipes.
YOU MAY ALSO LIKE:
Potato Bread
Easy Sourdough Bread
Easy Vermont Sourdough Bread
Basic Sourdough Bread – 1-2-3 Method
Whole Wheat Sourdough Bread
Sourdough Barley Bread
Easy Homemade Bread
Homemade Baguettes
Classic Focaccia
No-Knead Cheese Bread
Olive Bread
Homemade Breadsticks
Greek Yogurt Bagels
Caramelized Onion Bread
Ingredients
Caramelized Onion
- 1 large onion , chopped or thinly sliced
- 1 bunch green onion bulbs , chopped
- 2 tbsp olive oil
- salt
Dough
- 4 cups (500g) flour
- 1 tsp (5g) salt
- 25 g fresh yeast (2 1/4 tsp active dry yeast)
- 1 bunch green onion leaves , finely chopped
- 1 ⅓ cup (320ml) warm water
- caramelized onion
Instructions
- In a frying pan heat oil over medium heat. Cook onion until soft and golden brown. Season with salt. Set aside to cool.
- In a large bowl, mix flour with green onion leaves. Dissolve the fresh yeast with salt and 1/3 cup (80 ml) water and add to the flour mixture. Add the rest of 1 cup (240 ml) water, mix everything then add caramelized onion and knead until the dough is smooth and pulls away from the sides of the bowl. Cover it and let it sit for about 1 hour at room temperature to rise until doubled in size.
- On a floured surface roll the dough into a loaf. Place in a 6×10 inch (15x25cm) baking tray and leave to rise again for 30 minutes. A regular loaf pan should be as good. Optional sprinkle salt and a few green onion chopped leaves on top.
- Preheat oven to 470F (240C). Place a small pot with water at the base of the oven to create steam.
- Bake for 15 minutes with steam then remove the pot with water from the oven.
- Reduce oven temperature to 450F (230C) and bake for another 10-15 minutes.
- Cool on a wire rack. Let the bread cool completely before cutting.
Video
Nutrition
Did you make this recipe?
Please let me know how it turned out for you! Leave a comment below and tag @homecookingadventure on Instagram and hashtag it #homecookingadventure.
This looks so delicious! I love caramelized onions in anything…am sure they’d be awesome in a bread! Thanks for sharing.
I love that this bread calls for so much onion! I will have to try this recipe!
What a beautiful loaf of bread! No such thing as too many onions, I can’t wait to try this1
Wow this bread looks amazing! I’ve never made bread with caramelized onions before, but this looks fantastic. Nice job!
This would be so good for sandwiches.
Is the bread sturdy enough that it could be made into a bun?
Yes it is sturdy enough, there should be no problem to make it into a bun, anyway you can leave the dough as firm as you consider by adding less water.
Looks delicious – but QUESTION: I’m confused by the yeast amount. It states “25 fresh yeast” and I’m not sure what that means in terms of measurement. I’d love to try the recipe so would welcome any clarification – thanks!
Yes, thank you for noticing. It was my mistake, 25 g fresh yeast not 25 fresh yeast. Let me know when you try the recipe, hope you will like it as much as we did.
Wow, this looks so lovely and fresh! i wish my bread could rise like that!
Ohh wow!This is amazing!The recipe is fabulous and I can’t stop drooling at the lovely clicks!I can almost smell the aroma of fresh-baked bread from your photos:)
I have an event running at my place and would feel so honored to have your Bread recipe out there!Would love to have you come over and join the event if you wish:)
Cheers,
looks great. do you have to use bread flour?
I like to use bread flour but you can use all purpose flour also.
and its vegan!! So cool, this looks amazing!
Looks YUMMY!
But what do you mean by a “small baking tray”? Can you tell me inches/cms or cups/mls? Thanks!
I am not at home right now but with approximation it was a tray about 15×25 cm.
I love Caramilized and that looks so delicious
Would you mind converting your measurements to cups and tsps please. I think that 300 ml is about one cup, but 25g is equal to about 5 tsps. That is a lot of yeast! Or, is that just the way this recipe is?
I have used fresh yeast not dry yeast as I prefer the fresh one. 25 g of fresh yeast is the right amount for about 4 cups of flour. If you want to use active dry yeast I think that 2 1/4 tsps would be enough. Yes 300 ml is about 1 1/4 cups of water. Hope my answer helps, and let me know if you make this amazing bread recipe.
one way of making the bread could be to use Liptons onion soup pkg added to the water and cook til hot.Try my onion bread recipe: 1pg onion soup mix simmered in 2 c water…add 2 tbsp sweetener, 1 tsp salt, 2 tbsp parmesian cheese and 2 tbsp shortening …stir and cool…meantime, dissolve yeast as usual or use fast rise yeast 1 pkg added to some flour and add to 120 deg liquids. Beat and add flour..rise, then make one large loaf or 2 smaller ones, and slash tops
and sprinkle with cornmeal or cr of wheat..I put them on cookie sheet..Bake
after rising …25 mins or til done..yummm!!!
Best onion bread ever and goes well with spaghetti dinner!!!!
I DO NOT UNDERSTAND THE STEP OF PUTTING THE FLOUR IN A BAKING TRAY — ALSO IS A BAKING TRAY A BREAD PAN AND WHAT SIZE IS IT — COULD I ALSO MAKE A FREESTANDING LOAF AND COOK IT ON A STONE WITH STEAM??? — MANY QUESTIONS BUT I REALLY WANT TO MAKE THIS BREAD — THANKS SO MUCH FOR YOUR HELP —
TONYK
I sprinkled the pan with flour because I was afraid otherwise it would stick, because I didn't have at that time a good bread pan I used a regular cake pan of 15X25 cm. You can skip this step with flouring the pan if you are using a good bread pan or your stone. You can definitely try cooking this bread on a stone with steam. It will probably have a different shape but that won't be a problem, as the taste is amazing.
if any other questions feel free to ask me. Hope my answers helped you. Let me know if you enjoyed this recipe.
Could you use this recipe in bread baking machine? Only time tried bread without mavhihe I made a brick.
I don't know if it works or not in a bread machine. I've never made bread using a bread making machine, I don't have one and I don't know how to work with one. I'm sorry I can't help you with this. If you try let me know how it works.
Thanks so much for sharing! I made this bread tonight to accompany a pot of chili. Stumbled a bit when my pyrex dish exploded upon pouring the hot water in it. Oops! Turns out you need a cast iron skillet or the like to hold the water for steaming. It was a (sad) setback, but the final product was still delicious. I added a little honey, which worked well with the caramelized onion. Forgot the sea salt on top, but I will definitely add it next time. Great texture – should be good for sandwiches tomorrow. Thanks, again.
Cindy, thanks for your comment, I am very glad you tried this recipe. Sorry for the exploded dish, you must indeed use one that is resistant to heat. I used something very basic, a small enameled pan. The idea of adding honey is great, I will try it next time, too. Thanks for the idea.
This bread looks so amazing. I will try to make it wheat free. The flours I will be using first try is brown rice, oat bran, and almond meal with xanthan gum. I have not found fresh yeast in out local store so will be using dry. I am thinking I will need to use extra yeast due to the nature of the flour I ‘ll be using. Any suggestions for success?
It is hard for me to give any suggestion on that as I have never worked on a bread recipe without wheat flour. Lately this is the way I am making my homemade bread, I use oat bran, or barley flour, almond meal, rye oats, grounded walnuts and coconut flakes plus various other seeds, sesame, sunflower and pumpkin seeds, but always combine these with wheat flour, for its gluten properties which helps the bread rise. Don't know the content of gluten is found on the flours you are going to use so hopefully they will rise enough not to get the bread to sticky. Let me know if I can help you more.
I just finished making this and it turned out fantastic! I’m not usually a very good baker, but this was a really easy recipe 🙂
I am so glad you liked it, delicious easy recipe indeed, we love it too. Thank you for your comment, appreciate it.
I am so glad you liked it, delicious easy recipe indeed, we love it too. Thank you for your comment, appreciate it.
Hi there.. If I use instant dry yeast, are the steps exactly the same?
Yes, the steps are the same. I've made this bread with both types of yeast and worked perfect.
I found this recipe saturday night and knew it was something I just had to try!! I am a little but of a baker and have always enjoyed making bread without the use of a machine. I set to cutting onions right away, as I had no spring/green onions I have added lots of red onion to my onion element (cannot have too many) hehe.
I did the dough part the following day, allowing my onions to cool over night, this meant it was as fresh as could be for my Sunday evening plans. I used 1 and 1/2 cups of wholemeal flour and 2 and 1/2 cups of white bread flour (so it wasn’t an entirely white loaf). This bread has been sampled by me and my friend over some coffees and a good catchup 🙂 delightful!!
I Could not understand last baking step, Will I require two baking pots
one for dough and one for boiling water. Will it safe in otg oven
Yes, you will need 2 .. one tray with the dough… and another pot (I use an enameled small pot which is safe in the oven) to add the hot water to create steam, but if you don't want to use a pot with water in the oven.. just throw some ice cubes in there (this I learned recently and seems an easier method).. to create instant steam. With this step we want to be as close as possible to professional ovens. If any other questions don't hesitate to ask me. Hope you will try this recipe.
Hi! I tried this recipe and love it! The taste is excellent. But Somehow my bread came out a bit on the hard side. The bread was very compressed. Appreciate if you could advise on what I did wrong or what I need to do instead for my second attempt? Thanks so much!
Thank you Munirah for trying this recipe. This bread does have an amazing taste and texture.. it shouldn't have been hard….It's difficult for me to realize if you did something wrong, but if it was on the hard side.. it is possible that you used more flour than written in the recipe? Or maybe the yeast.. was not active enough…what kind of yeast did you use? What kind of flour? Let me know so I can advise better.
This would be so good for sandwiches.
Can I take a video of you and I Reshare?
Thank you
As I am writing this my Dough is (hopefully) rising.
I added some dry chives to the mix because i used a bit to much water and ran out of flour.
My Loaf turned out great!
Great Crust on the outside soft fluffy and full of flavour on the inside.
Love the site and the recipes! Making the Potato stacks as side dish for dinner tonight 🙂
Just finished the bread. Lovely, thanks a lot for the recipe!
Happy to hear that Virgil:) maybe you can send me photos via Instagram or Facebook
I can’t get to bake fully in the middle… The bread is ready from the outside but when I check it with a toothpick the inside (just the middle part) isn’t fully done.
What am I doing wrong/ how can I solve this>?
By the way, it’s still awesome
Thanks,
Itamar
Hello Ella can I just skip the steaming part..??
Hi, just a few concerns as below:
1. If I am to store the dough to bake later, what can I do? Will it be fresh as it will be when done immediately?
2. Also does this bread have to be served as soon as its baked or will it taste good even after it gets to room temperature? Eg. if I bake it at noon, will it be fresh to have it for dinner?
3. What is the best side-dish/accompaniment for this bread?
4. How many days will it stay good?
TIA! 🙂
I baked tonight, It was perfect. Thank you for this golden recipe.
I am glad you enjoyed it:) one of our favorite bread recipes as well
I just baked the bread & it was excellent! What a terrific recipe. Thank you for sharing!
I have used this recipe at least 10 times. I have never made it into a loaf. Always into buns. Same recipe. And I usually double the onions. One is just not enough. And I add a little sugar into my active dry yeast even though it’s not really necessary but i think it helps. I add the salt into the flour itself and not into the yeast. Then after an hour of rising, I divide them into 90-100g/bun each. Let them rise the rest of the 30mins, as per recipe and follow the rest. I have also frozen the leftovers and heat them up in the microwave with a cup of water next to it. As good as made today. My husband is Finnish (they are avid bread eaters) and he approves this. This recipe is a solid keeper. I will pass it down to my daughters. Go for it, guys! And BIG THANK YOU, Ella!
hi, Thank you very much for sharing your wonderful recipes I tried a lot of your recipes , this one is the most recent , its a hit i work as a cook on board a cargo ship and you help me a lot , all your recipes are a big hit keep it up and more power
This is absolutely, hands down the best Caramelized Onion Bread i’ve ever tasted!!!! This will definitely be a staple in our house!!! Thank you so much for sharing the recipe!! It’s simply fantastic!!
Keep posting yummy dishes
Im a baker. Never put salt with yeast. Salt kills yeast. Sugar feeds yeast. Salt killls it.
Hi. Would love to try out this recipe. I have an average size mircrowave oven. Max baking temp is only 220 C, and it can only increase or decrease by every 20 degrees. Please help. Thanks
This bread is amazing. I followed recipe as written and the bread was too darn good – I had to stop myself from eating the whole loaf in one sitting – Yum
I just made this, tho increased the amount of portion to 700g flour, and made them into 12 smaller buns. They came out insanely delicious!!! Amazing recipe thank you!!!
I tried this recipe today and it turned out great. I had to use instant yeast because I couldn’t get fresh yeast. My guests loved it too. Only thing I’ll change next time is to line the bottom of my pan. I forgot this time and spent a good ten minutes prying the loaf from the bottom of the pan with a knife 🙂
I’ve made this bread several times now and it never fails to draw the household into the kitchen. It’s delicious, really foolproof and so easy. Thanks for providing it; it’s in my “go-to” file for scrumptious, simple bread that I am always confident will please!
Hello,
My yeast did not rise…should it say sugar instead of salt? I’m so sad I wasted all of the ingredients ????
I love this bread easy and delicious. Thank you for sharing!
Wonderful recipe! Thank you so much. I have made this several times and I needed to make one small change. 470* was too hot for my oven I baked it at 450 the whole way through, removing the water half way through. PERFECTION!!
Dear Ella – I attempted to make a Gluten Free (GF) version of the Caramelised Onion Bread last week, making two loaves which smelled gorgeous; however, I used GF Bread Four and a active dry yeast and followed the recipe exactly as directed. My complications were that during proofing, the bread did not rise very much at either stage, and when finally baked the loaves again smelled really lovely but they came out like bricks. I cannot use normal bread flour and it’s very difficult to buy fresh yeast, do you have any other ideas on how I can make this loaf successfully? Thank you in advance for your help. Best wishes.
Thank you for your patience, and I’m so sorry for the delay in getting back to you. Gluten-free bread can be very tricky since it doesn’t have the gluten structure to trap the air from yeast, which is why your loaves turned out dense.
A few tips that may help: try using a GF flour blend with binders (or add a little psyllium husk or xanthan gum), keep the dough wetter than you’d expect, and proof just once in the pan before baking. Fresh yeast isn’t necessary—your active dry yeast is fine.
I love your idea of a GF version of this bread, and I’ll keep it in mind for future testing.
Best wishes,
Ella
For 1 tablespoon whole husks, add an extra 1–2 tablespoons of water to the dough. The dough should look more like a thick batter than a firm, kneadable dough. Let me know if it works.
Trusting this is a legitimate site as I wrote an honest review a few days ago seeking help on my being able to make a gluten free version of this bread, but cannot see my review here at all. I did make the bread following the instructions to the letter but using GF flour. I made two loaves and the bread came out smelling beautiful; however, and very sadly, they were as solid as bricks – would like your help if possible. Thank you
Just sent you a reply on this, on the other comment. Sorry for the delay. Hope my answer helps.
I have found this dough to be incredibly hard to work with as it comes out very sticky. I have attempted it several times and it is always so sticky it is impossible to work with. I end up very frustrated by the time I am done getting it into loaf pans. I do not understand what I am doing wrong. Thank you!
It’s possible it needs more kneading to develop the gluten, or the flour wasn’t strong enough. Whenever I make bread dough I like to use strong flour, not cake flour. A little oil on your hands and gentle handling can also help.
This bread is fabulous, I’ve made it for a bake sale in the office, friendsgiving and a christmas party. It’s a crowd pleaser. No changes made
So glad you enjoyed the bread 🙂 It is one of our favorite bread recipes too.