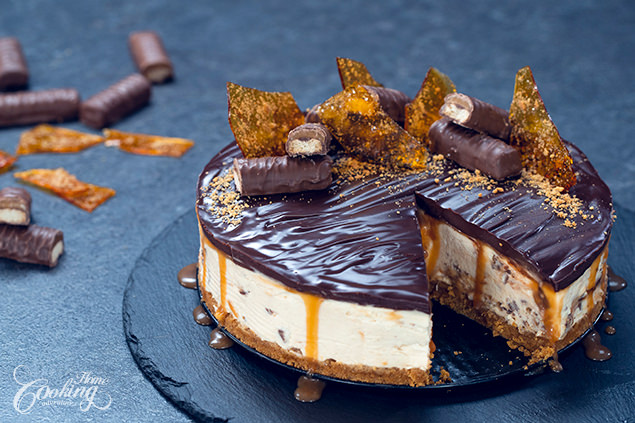
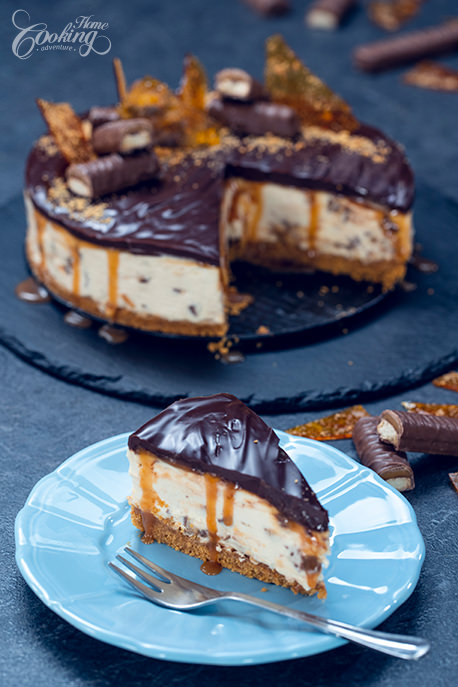
If you love Twix Bars and salted caramel, you should definitely try this amazing No-Bake Twix Cheesecake. It has a crispy biscuit crust, a creamy caramel cream cheese filling with pieces of Twix bars, and it’s topped with salted caramel and chocolate ganache. Trust me, it’s one of the most delicious desserts I’ve ever made. It’s heavenly and really easy to make.
How to make No-Bake Twix Cheesecake
There are few steps you need to follow to make this Twix Cheesecake. First prepare the salted caramel sauce, then prepare the crust and continue with the cream cheese filling. Then prepare the chocolate ganache and decorate the cake.
Prepare the salted caramel sauce
To make the salted caramel sauce, combine sugar and water in a saucepan over medium-high heat. Let it dissolve and turn caramel in color without stirring. Remove from heat, add cream (expect bubbling), and stir for a minute until smooth. Mix in vanilla extract, butter, and salt until well combined. Set aside to cool.
Prepare the crust
For the crust, line an 8-inch springform pan with parchment paper. Crush crackers or digestive biscuits in a food processor, then mix with melted butter until moistened. Press the mixture into the pan’s bottom using a spoon. Refrigerate while preparing the filling. Optionally, line the pan with acetate sheet for easier removal.
Prepare the caramel cream cheese filling
To prepare the cream cheese filling, cut Twix bars into small pieces. In a large bowl, combine cream cheese, vanilla extract, powdered sugar, and ½ cup of salted caramel sauce. In a separate bowl, whip cream until stiff peaks form. Gently fold the whipped cream into the cream cheese mixture and incorporate the Twix pieces. Pour the mixture over the crust and refrigerate for several hours or overnight.
Prepare the topping for the Twix cheesecake
Spread ½ cup of salted caramel sauce over the cream cheese filling, leaving a ½-inch border. Refrigerate while making the chocolate ganache.
For the chocolate ganache, melt chocolate and cream in a heatproof bowl over simmering water. Once melted, spread it evenly over the caramel layer. Refrigerate for 30 minutes before serving.
To finish, decorate with Twix bars, caramel shards, and crushed biscuits. Serve with remaining caramel sauce if desired.
The best part about this No-bake Twix Cheesecake is that it requires no oven time. After assembling the layers, the cheesecake needs to chill in the refrigerator for a few hours or overnight to set, allowing the flavors to meld together and the texture to become firm and sliceable.
Whether you’re hosting a dinner party, celebrating a special occasion, or simply craving a decadent dessert, the No-bake Twix Cheesecake is a showstopper that will impress your guests and leave them wanting more.
Hope you will try this No-Bake Twix Cheesecake and enjoy it as much as we did:) If you do, make sure to share the photos with me on Instagram. Would love to see your take on it.
Other caramel recipes you may like to try
Explore the heavenly combination of apple, caramel, and crisp flavors with our irresistible Caramel Apple Crisp Cheesecake. This delectable dessert features a creamy cheesecake filling infused with apple goodness, topped with a luscious caramel sauce and a crunchy crisp topping.
This amazing Snickers Mousse Cake is made of a chocolate peanut sponge cake at the bottom topped with an irresistible gooey salted caramel and peanut layer, followed by a silky flavorful peanut and cream cheese mousse and all topped with a shiny chocolate glaze.
This amazing Banana Caramel Chocolate Mousse Cake is made of a chocolate banana sponge cake at the bottom topped with a delightful salted caramel, banana, and toasted pecans layer, and followed by a smooth caramelized chocolate mousse. The cake is decorated with an amazing edible flower made with whipped cream and caramelized chocolate curls.
YOU MAY ALSO LIKE:
Classic Cheesecake
Chocolate Basque Burnt Cheesecake
Biscoff Crème Brûlée Cheesecake
Low-Fat Refined Sugar-Free Cheesecake
Twix Bars
Brownie Raspberry Cheesecake
Basque Burnt Cheesecake
Chocolate Cheesecake Flan
Chocolate Chip Cookie Cheesecake
Cheesecake Flan – Puerto Rican Flan de Queso
Japanese Cheesecake
Marbled Chocolate Pumpkin Cheesecake
Caramel Apple Cheesecake Bars
Nutella Cheesecake
No-Bake White Chocolate Oreo Cheesecake
No-Bake Twix Cheesecake
Ingredients
Cookie Crust
- 9 oz (250g) digestive biscuits or graham crackers
- 1/2 cup (110g) butter , melted
Salted Caramel Sauce
- 1 ½ cup (300g) sugar
- 1/4 cup (60ml) water
- 3/4 cup (180g) whipping cream
- 3 tbsp (45g) unsalted butter , room temperature
- 1 ½ tsp (7.5g) vanilla extract
- 1 1/2 (7.5g) salt
Cream Cheese Filling
- 21 oz (600g) cream cheese , room temperature
- 1/4 cup (30g) powdered sugar
- 2 tsp (10g) vanilla extract
- 1/2 cup (120g) Caramel sauce
- 1 cup (240g) whipping cream (35% fat) , chilled
- 2 xtra twix bars , (150g)
Topping
- 1/2 cup (120g) salted caramel sauce
Chocolate Ganache
- 4 oz (120g) semisweet chocolate
- 4 oz (120g) whipping cream
Decoration
- caramel shards
- twix bars
- crushed biscuits
Instructions
First prepare the salted caramel sauce.
- Place the sugar and water in a medium heavy bottomed saucepan over medium-high heat, and cook without stirring until sugar dissolves and gets a caramel color.
- Remove the pan from the heat and add the cream. It will bubble a little bit.
- Cook for about 1 minute stirring constantly with a wooden spoon or spatula until smooth.
- Remove from heat and add vanilla extract, butter and salt. Stir well until smooth. Transfer into a bowl and set aside to cool.
Prepare the crust.
- Line with parchment paper a 8 inch (20cm) springform pan (with a removable base). Place the crackers or digestive biscuits into the bowl of a food processor and crush until crumbs form. Add melted butter and mix until evenly moistened.
- Press the mixture into the bottom of the pan using the back of a spoon. Refrigerate until you prepare the filling. If desired, line the pan with an acetate sheet for easier removal.
Prepare the cream cheese filling.
- Cut the twix bars in smaller pieces and set aside. In a large bowl mix cream cheese with vanilla extract and powdered sugar. Add ½ cup (120g) salted caramel sauce and mix to combine. In another bowl mix cream until stiff peaks form. Gently fold the whipped cream into the cream cheese mixture.
- Incorporate the twix bar pieces into the cream cheese mixture. Pour the mixture over the crust. Cover and refrigerate for several hours or overnight to set.
- Spread ½ cup (120g) salted caramel sauce over the cream cheese filling leaving a ½ inch (1cm) border. Refrigerate until you prepare the chocolate ganache.
Prepare chocolate ganache.
- Place chocolate and cream in a heatproof bowl and place over a pan with simmering water. Melt over low heat.
- Spread it evenly over the caramel.
- Refrigerate for another 30 minutes before serving.
- Decorate with twix bars, caramel shards and crushed biscuits. Serve with remaining caramel sauce if desired. Enjoy!
Video
Nutrition
Did you make this recipe?
Please let me know how it turned out for you! Leave a comment below and tag @homecookingadventure on Instagram and hashtag it #homecookingadventure.
Just wanted to let you know that I made this cheesecake today!!
I usually find it very hard to make caramel and it always ends up crystallized.
But with your recipe and techniques, I nailed it for the very first time.
The cheesecake was delicious 🙂
Thank you for the wonderful recipe!
I tried making this and it was great! I have a question though, while I was waiting for the crust+cream filling in the refrigerator, the cream sauce started crystallising. Is there a proper way to store the caramel sauce, while waiting for the rest of the cake, to avoid that?
The caramel sauce can be stored in an airtight container on the counter while the cream cheese is setting in the fridge. Hope this helps!
I’ve made this cheesecake twice now, one of which I gifted to my neighbors. The ranted and raved about it. Thank you so much for an incredible recipe.
I have made this cheesecake for my husband’s birthday and it has taken rave comments! It is awsome! Thanks for this recipe! I have made many of your recipes, and i was never disapointed!
I am so glad to hear that Thomai 🙂 Happy birthday to your husband 🙂
I want to make this cake for a party but I have to drive an hour with it. Do you suggest freezing it so it doesn’t melt during the commute?
Yes.. this cheesecake can freeze well. You can also consider using a travel cooler. Whatever works best for you.